Spring Babies

It seems that it’s not only the animals that are having all their babies at this lovely time of year. I have been amazed at how many of the school Mums have announced they are having a baby or have given birth. So I thought it was a good idea to start on some more new baby cards.

My daughter’s ballet teacher is also due to give birth in the next few weeks, and all the Mums have had a collection. I offered to make the card as my contribution, so I decided to use my ‘dangler’ card style but make it A4 to allow enough room (hopefully) for all the Mums to sign it. We know it’s going to be a boy, so that made the choice of colours pretty straightforward! I added some blue gems as well after I took this picture. I hope she likes it!

P1240868

I really am loving making this style of card at the moment and having made a blue card I wanted to even up the score so, I made a pink one as well. This one is 5×7 in size and will be on sale in my stand at the newsagents down the road.

Pink pram

Pink pram

I can’t wait to make some more. I’m liking the idea of a yellow one, but I’m not so sure how popular that will be. Everyone seems to find out what they are having these days. I wanted a surprise, but I think I am in the minority.

I think I will go and enjoy some of the dry weather and add to my stock of baby blankets to go with the cards!

Happy spring crafting
x

New style cards

I’ve been looking around for some inspiration and ideas to make a new range of cards for this year. While watching one of the shows on Create and Craft tv, I saw one of the crafters make what they called a dangler card! I’m not sure of the name, but I really liked the way her card was put together, so I decided to have go myself. With My Mum’s birthday, Mum and Dad’s wedding anniversary and Valentine’s day all coming up, I thought they would make a different card. It’s also been a chance to use some of the enormous stash of coloured card in my craft room!

P1240743

P1240823I’ve never been particularly confident using embossing folders.  Don’t get me wrong, I know how to use them, but I’ve never really found a use for them in my cardmaking.  So it was great to finally use one of the background embossing folders for the birthday cards.  I love how it gives some extra interest to the backing.  I used some linen card on these and adding the embossing just gives it a bit more oomph!

P1240822

P1240821I thought I would take it a step further and use one of the heart dies I have.  This intricate one is from Spellbinders and I’ve only ever used it as an embellishment, so to use it cut out of the main card elements was something totally new for me.  I really enjoyed making these cards, the blue one is for my Mum and Dad’s 45th wedding anniversary (sapphire, hence the blue).  The red one is for my husband for Valentine’s Day.

P1240744

Finally I changed the shape of card and went for a square card with circular aperture.  This time I used the delicate heart die to make the ‘dangler’ and added a tattered lace die cut butterfly.

All of the dangler pieces are attached using acetate, so they almost look like they are floating.  I’m not sure whether a ‘floater’ card is better or worse than ‘dangler’, but name aside, I like this new look and think I will be using this style as my focus for cards this year.  It’s a great way of using up the plain coloured cardstock I have and can’t wait to get going on Christmas cards, I can see floating snowflakes everywhere this year!!

Time to think about Mother’s Day though first.

Happy crafting
x

January Birthdays

January and February are busy months for birthdays and anniversaries for us. So the beginning of the year is always taken up with family crafting. This year I’ve decided to have a real go at using up some of the numerous card-making kits I’ve bought over the years and see what I can come up with.

The great things is that all the people celebrating are of different generations and have totally different likes.

I started off with my in-laws. I was inspired by a visit to see the Flying Scotsman on our local steam railway and made this card for my Father-in-Law using a Hunkydory kit.

P1040158

I followed this with a card for my Mother-in-Law, using another Hunkydory kit, this time the little book of birthdays. Such lovely designs and I just couldn’t help adding some die cut butterflies!

P1040157

Next it’s my nephew’s first birthday. So not a card he would appreciate so much as one for his parents! I was given a set of balloon dies and some number dies for Christmas which was perfect for this occasion. This is a great card for using up offcuts of papers.

P1240731

I’ve also made cards for my Brother-in-Law, Sister-in-Law and my husbands Best man. The little book of birthdays and male images have been a great investment here!

P1240739

P1240738

Finally for now is my other nephew’s fifth birthday in a couple of weeks time. He’s mad about Star Wars at the moment, so I made him a spaceman card. I hope he likes it.

P1240740

Well it’s time to get back to desk, I have my Mum’s birthday and Mum and Dad’s 45th wedding anniversary to make for, as well as Valentine’s Day!

Happy crafting
x

My daughter’s Birthday!

With Alice’s birthday being so close to Christmas and New Year, it’s always difficult to organise anything. In the past we’ve had a family meal out and then taken her and a couple of friends to a local soft play centre to let off some steam before going back to school. She’s growing up though now and soft play centres are staring to look a bit young for her, so we decided to have a proper party for her and few friends a couple of weeks after her birthday, so that we could arrange invitations.

We decided on a ten pin bowling party and the bowling alley provided all of the invitations, so there was no need for me to make any. I was a bit disappointed, but I threw myself into making the party bags instead. I must have been feeling a bit mental to take on this task as I was thinking about making the bags, decorating them and then sourcing everything to go inside them as well. It doesn’t sound like much when you say it quickly, but it was taking ages! I had a couple of practices at making the bags / boxes, but nothing was quite right, so I ended up on a shopping trip for gifts and found a selection of gift bags in blue and red that I thought would do the trick.

I set about making rosettes for each child and a personalised gift tag for each bag. My daughter chose the papers she wanted me to use – Papermania cupcakes! The rosettes are made using a template from Papermania and uses very little glue, but a lot of cutting. I enjoy making them, but making ten did take a while. I might have to keep my eyes open for a die to cut them out in future. I don’t mind all the folding and sticking together though, it’s quite therapeutic. Fortunately I do have a gift tag die which worked well with the papers and for the size of the bags.

P1240735

I really wanted to make them a bit different to what we normally get in a party bag, so instead of loads of sweets, cheap plastic toys and other such tat, I had a great afternoon browsing the sales. Each bag had a piece of cake and a couple of sweets in, but the girls bags included hair chalk, lip balm and hair bands, while the boys had shower gel, a flannel and a snake. Alice was quite upset that I hadn’t made one for her, but she did enjoy putting all the things in the bags and tying on the tags.

I’m pleased to say they all seemed to go down well with the parents as well as the children.

The party was a success too and Alice ended up with plenty of presents. So we thought it would be a nice touch to make some thank you notes too. I used up some scrap bits of papers for each little ‘envelope’ and used a scalloped circle die to make the flap. I printed out the notelet from the computer and we stuck each one inside each little envelope. Alice signed each note and wrote the name on the front.

20160119_155923

I think they look quite cute and she loved giving them out. All in all I think it was a success.

Happy crafting
x

Hunkydory Prize Winner!

I’ve been a member of the Talkies craft group on facebook for about 18 months or so now, and while I take part as much as I can I haven’t really entered any of the competitions or swaps. However, in October they announced a little competition to make a card from any Hunkydory craft kit. It could be anything, the only rules being you couldn’t use any dies or any other kits, only basic essentials could be used for embellishments, so it was let your imagination run wild with any kit you liked. I thought about entering for a while, but wasn’t sure my simple approach to card making would be up to the intricacies of some of the very seasoned crafters.

In the end I decided to enter one of my cracker Christmas cards made from one of the Christmas kits. It met the brief and I was pleased with the finished card.

P1030255 (2)

I did leave entering until the very last minute, so later the same day I was astounded to find that I had been judged as the winner! The judge really liked the simplicity of the design and how I used the features of the cardstock to enhance the cracker!

My prize was £30 of Hunkydory products, which I am delighted to say have arrived this morning in the post!  What a lovely bundle it is too.  I haven’t shown it to Alice yet as I’m sure she will want to get her hands on it as it is a full set of toppers, decoupage, concept cards, envelopes, cardstock, and inserts from the ‘Smudge and Mitten’ collection.  So cute, watch out for these cards in the future.

P1240664

Thank you to everyone involved in the competition and to Hunkydory for such a lovely prize.

Happy crafting
x

A touch of Autumn Colour

This week I fancied a bit of relief from all the Christmas bits and pieces in my craft room. I finished reading the latest issue of Craftseller and decided to use some of the papers that came with it to make a couple of Autumn themed cards.

There seems to be no end in sight to the trend for woodland themes, so I thought I’d make these cards using the lovely leaves and woodland animal prints. It’s lovely to use some different designs and colours.

P1240585

It’s really starting to feel like Autumn as the nights are drawing in and we’ve just started to lose the leaves off the trees. I expect we will get some strong winds soon and the rest will descend to the ground all in one go. But for the time being I am enjoying the beautiful colours and the glorious Autumn sunshine.

I am very lucky to live close to farmland and there are lots of trees in the area too.  While I sit in my craft room listening to the radio, I can look out on several very mature trees.  We have a fabulous horse chestnut tree over the road which always seems to have a squirrel in it – he’s a real little terror, dropping conkers on passers by!  These papers are the perfect accompaniment to watching the squirrel running around.

P1240586

The colours work so well with some recycled kraft card.  Mixing the brown natural cardstock with bright white really makes the colours of the leaves pop.  A lovely chance for some Autumn colour.

Happy crafting
x

New Christmas Cards

I feel like I’ve been in full-scale Christmas production forever! It’s amazing how quickly the festive period sneaks up on you, and with my craft stall being only a couple of weeks away, I am pretty much in Christmas card mode exclusively. I made a few Christmas cards from this contemporary Hunkydory kit a few years ago, and I love the colours, so I thought I’d make some more.

These are all different concepts for me, very 3d in their design. I started with some little snowglobe style cards. These are so cute and have a little stand at the back.

P1240375

Next is the little row of houses. These have lovely glittered roofs.

P1240373

This is a square card where the decoupage stands out on a zigzag to give the dimension. They give a great perspective effect and these might be something I explore further at a later date (I have added it to my ever growing list of things to try further).

P1240371

Finally I was left with loads of fabulous designer cardstock and images to use. So I put together a few individual cards. I love this stylised Christmas fairy – as does my daughter.  She’s a definite winner with the girls.

P1240364

Time to get back to the Christmas makes.

Happy crafting
x

Christmas Cracker Cards

This year I have decided to get going with my Christmas cards a little earlier than usual. I made some poinsettia cracker cards from kraft card a couple of years ago and really loved the idea, so I thought I’d expand on it for my cards this year.

So I’ve been delving into my Christmas crafting box to see what I have in there. It’s amazing how much stuff I have accumulated and completely forgotten I have! It was nice to have a plan for a change though, so I was looking for ideas for making and decorating crackers.

I found some kraft card DL card blanks so started with those and decided to use up some of the craftwork cards kits I have purchased over the last few years.  The paper and card quality is fabulous and I loved the more muted colours in these kits. I also used some of the paper bows to add detail on the sides of the toppers, it was great to make some of them up and mix them with the papers.

P1240405

It was nice to make different cards for change, using sentiments as the main focal point of the card instead of images. Having made this I was eager to make some more in a slightly different style, so I made some little owls again. This time using some papermania Christmas papers and mixing the designs up has given some interesting effects. The colours here are a little more contemporary than the first set, but equally as stunning I think. I toyed with some options for the bows, using bakers twine or ribbon, but as I wanted to co-ordinate I decided to make the bows myself using the leftovers of the matching papers.

P1240467

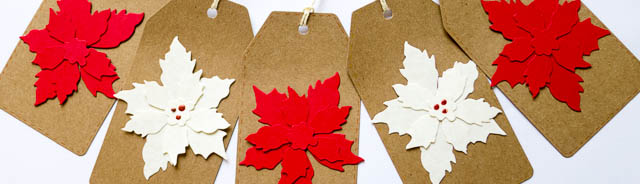
This has now started a bit of a production line of different styles of cracker cards and really got my imagination going, out came the stamps, dies and papercrafting kits. I have a fairly large paper and card collection which have been saved for a ‘special occasion’, but I thought it’s time to start using some and I made some of my own card blanks as well. The patterned card makes a great backing for some handcut toppers too. I really love poinsettias at Christmas and making them up in different colours is great fun.

P1030256

I’ve been a fan of the Hunkdory cardkits for some time and have loads of them. The cardstock is so gorgeous though that I’ve always wondered what to do with it to make the most of the images. Now I’ve found a way of using some of the cardstock. So I’ve gone for some traditional images and as a compromise, there are some cute animals and some contemporary images too. There is such a great choice of colours too, ranging from very cool and crisp to the warm and cosy. I could just snuggle up by the fire with the little cat on the cushion!

P1240581

P1240580

P1030255

Finally I found this gorgeous Christmas kit. I have no idea where it came from but the colours are just gorgeous.

P1240466

The joy of making my own Christmas cards is that although the overall design is very similar, each one is individual. Once I’ve used up each paper design that’s it!

I will be taking all of these cards along to the Ramsbottom Pre-Christmas Craft Fair on Saturday 31st October, so they will be for sale. If you are in the area, it would be great to se you.

Happy crafting
x

New Baby Cards

A few weeks ago I received a request to make a large number of new baby cards, for a church group that give out packs of essential clothes and accessories for new Mums. So I started on a few samples. As I needed to be able to make a large number of cards in a similar style, I had to look at items I had in my stash that would allow for this. So out came my stamps and inks, as well as packs of pastel papers and some small paper doilies.

These were my first three samples.

P1240380

P1240379

P1240378

The feedback was good for these, and I really enjoyed doing some stamping for a change. So much so I think I will be making a trip to Clark Crafts soon on the hunt for some new inkpads.

The group often don’t know the sex of the babies, so they asked for some similar in neutral colours. I was slightly surprised at this request as I assumed everyone finds out now what the sex of the baby is at their scans. I didn’t want to know, but I was a real exception amongst the people I know. I decided I wanted a surprise, so all my initial baby purchases and the nursery were cream and beige. Anyway, I had to hunt out yellows and greens for the set of cards. It was much harder than I thought it would be to find little toppers that would go with yellow and green, everything I found was blue or pink!

I managed to make up the following sets in neutral colours.

P1240384

P1240386

I hope this will become a regular order, so I have ordered myself a set of new baby dies to make my own toppers from the papers in my stash. I can’t wait to get on with some more, as it has made a lovely cheerful change to all the Christmas cards I’ve been making!

Happy crafting
x

Hunkydory

Over the last few weeks I’ve been inundated with family requests for cards, so many birthdays, anniversaries and we even had a wedding this year! When you get to my age all the weddings just seem to stop, now it’s 40th and 50th birthdays of friends and we’re all waiting for the weddings of our children – which will be some time off yet!

Anyway, I invested in some of the Hunkydory ‘little books’ a little while ago, and as I have needed some quick cards recently, I decided it was time to stop looking at the images and actually use some. As I have quite a collection of Hunkydory cardstock, these little books are brilliant to put with card I have already. The images are really lovely too and there are loads to choose from in each book. I have one for men, one for birthdays and one about birds and they seem to cover every occasion. The bird images range from paintings of garden birds to more contemporary designs, these lend themselves beautifully to wedding and anniversary cards.

P1240385

P1240382

P1240297

P1240284

P1240283

I’ve also had quite a few birthdays this last few weeks and these images have been great for all ages.  This ‘hipster’ image really made me think of my brother.  I’m not really sure why as he doesn’t have a moustache or beard, neither does he ride a bike, but the overall feel of the image was just right.  It’s such a cool colour scheme, the little hints of teal work so well with the bright red and black.  I love it!

P1240282

This was the card I made for one of my daughter’s friends birthday. It comes from the birthday book and looks so lovely, I just couldn’t resist making a card with it. It really reminds me of my daughter on her bike, full of life, and the butterflies set it off perfectly.  I found this lovely cloud paper in a back-issue of Craftseller and love the dreamy feel it gives to the card.
P1240294

My next card was for my hubby, he loves a glass of red wine, so this image was perfect. I coupled this with a bottle of rioja from a local wine merchant, and made up a hamper of cheeses, biscuits, snacks, pasta and sauce. It was very well received and we all enjoyed a lovely dinner with the contents.
P1240298

Finally here’s my card for an ex-work colleague who has a small boat that he likes to sail over the summer.
P1240281

One of the things I love about making cards is being able to make something individual for the recipient, and these little books are great as there just seems to be an image to suit every occasion and age. I am sure they will come in very handy over the next few weeks and months. Time to get thinking about Christmas cards next though!

Happy crafting
x